


Walkin’ Fit Adjustable Splint
Are you a Pet Care Professional?
Request an account to view pricing.
If you are an existing pet care professional, simply login.
The Walkin’ Fit Adjustable Splint is designed to provide a comfortable, customizable fit for any pet and designed to stabilize and support either a pet’s Tarsal or Carpal joints. This splint features an adjustable angle to accommodate a pet’s front or back leg.
The Walkin’ Fit’s width and angle can be adjusted as you progress through a treatment plan to maintain a proper fit for your patient. You eliminate the need to stock multiple splints and the delay caused by custom ordering braces for different sized dogs and conditions. The Adjustable Splint allows you to fit and treat patients on the spot easily.
Features:
- Supports both the Tarsal and Carpal joints
- Adjustable width accommodates bandaged limbs or swollen joints
- Each splint features a non-slip tread to help the patient gain traction
Clinical Advantages:
- Accommodates a patient’s specific anatomic considerations – “posty” or “low” conformation
- Can re-establish range of motion slowly
- CCT Mechanism injury assistance
- Useful for Tibiotarsal instability and Collateral ligament injuries – either medically managed or in recovery or early mobilization phase post-op
The Walkin’ Fit® Adjustable Splint may benefit pets with the following conditions:
Rear Leg Conditions:
- Osteoarthritis of the Tarsal or Metatarsal joints
- Degenerative Joint Disease (DJD)
- Polyarthritis
- Soft Tissue injuries to Tarsal or Metatarsal Tendons/Ligaments
- Achilles Tendon Injury
- Tarsal or Metatarsal joint instabilities or malformations
- Post-Surgical protection
- Medical Management of Tarsal or Metatarsal injuries and treatment
- Neurological conditions causing knuckling
- Wound management aide
Front Leg Conditions
- Soft Tissue injuries to Carpal or Metacarpal tendons/ligaments
- Osteoarthritis of the Carpal or Metacarpal joints
- Hyperextension injuries
- Polyarthritis
- Carpal or Metacarpal joint instabilities or malformations
- Brachial Plexus or Radial Nerve damage injuries
- Neurological conditions causing knuckling of paw
- Degenerative joint disease
- Post-surgical protection
- Wound management aide
Professionals Guide to the Walkin’ Fit Adjustable Splint
The Walkin’ Fit Adjustable Splint is designed to provide a comfortable, custom fit while providing stability and support to the Tarsal or Carpal joints. Custom-made splints can be expensive and take weeks to be made. Our adjustable splint may be used on the front or rear legs. Our splint will allow you to fit patients on the spot. This splint’s width and angle can be adjusted as you progress through a treatment plan to maintain a proper fit for the patient. The adjustable width allows you to accommodate any swelling or bandages while providing joint stabilization.
Advantages of an Adjustable Splint over a normal splint in a clinical setting:
- May be used on Tarsal or Carpal joints
- Patient-specific anatomic considerations – “posty” or “low” conformation
- Can re-establish ROM slowly
- Useful for Tibiotarsal instability/Collateral ligament injuries – Either medically managed or in recovery/early mobilization phase postoperatively
- CCT mechanism injury assistance
- Adjustable width accommodates bandaged limbs
The Walkin’ Fit Adjustable Splints come in a range of sizes to ensure most breeds are covered. All splints feature an adjustable angle and width, which gives this splint the ability to fit multiple pets. We recommend measuring the patient while in a standing position for the most accurate measurements if possible. If your patient’s measurement falls between sizes, please call our Veterinary Resources team at 1-866-578-2926, and they will help you determine the correct size.
FRONT SPLINT USAGE SIZING GUIDE
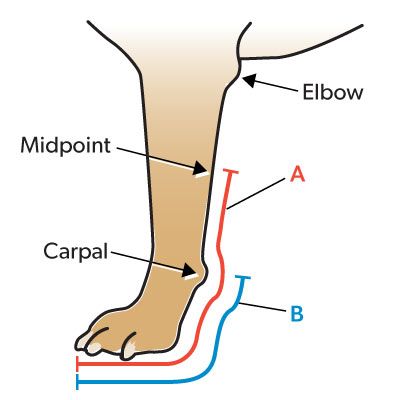
A: Measure from end of longest toenail to midpoint between carpal joint (wrist) and elbow.
B: Measure from the end of longest toenail to center of carpal joint (wrist).
| Size | A: Total Length | B: End of nail to carpal or hock point | C: Paw width |
|---|---|---|---|
| X Small | 6.875″ | 4.875″ | 1 – 1.375″ |
| Small | 8.875″ | 6.125″ | 1.25 – 1.75″ |
| Medium | 10.375″ | 7.25″ | 1.5 – 2″ |
| Large | 12.5″ | 8.75″ | 1.75 – 2.5″ |
| X Large | 14.25″ | 10″ | 2.25 – 3.25″ |
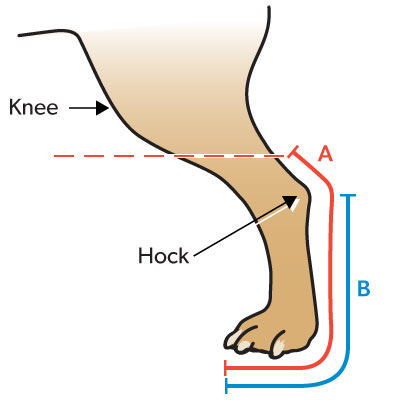
REAR SPLINT USAGE SIZING GUIDE
A: Measure from end of longest toenail to midpoint between hock and knee.
B: Measure from the end of longest toenail to top of hock.
| Size | A: Total Length | B: End of nail to carpal or hock point | C: Paw width |
|---|---|---|---|
| X Small | 6.875″ | 4.875″ | 1 – 1.375″ |
| Small | 8.875″ | 6.125″ | 1.25 – 1.75″ |
| Medium | 10.375″ | 7.25″ | 1.5 – 2″ |
| Large | 12.5″ | 8.75″ | 1.75 – 2.5″ |
| X Large | 14.25″ | 10″ | 2.25 – 3.25″ |
IMPORTANT: Please reference the appropriate sizing guide when measuring a pet. The sizing recommendations may vary based on FRONT or REAR leg intended usage.
For most FRONT leg use, the splint angle is set on the second notch at a 10-degree angle.
The splint should be set on the middle notch or 30-degree angle for most REAR leg use unless otherwise recommended by your veterinarian.
Please Note: There is no “right” or “left” leg or paw designated for splints; splints may be used for either the right or left leg/paw. If you order a splint marked with “L,” it refers to the splint’s size (Large).
Watch How to Measure Your Pet for the Adjustable Dog Splint!
We know patients come in all shapes and sizes. To make it easier to select the right size splint for your client, here are a few additional measurements:
| Splint Size | Leg Width at Hock/Carpal |
|---|---|
| XSmall | 0.5”-0.875” |
| Small | 0.625”-1.125” |
| Medium | 0.875”-1.375” |
| Large | 1.125”-1.75” |
| XLarge | 1.375”-2.25” |
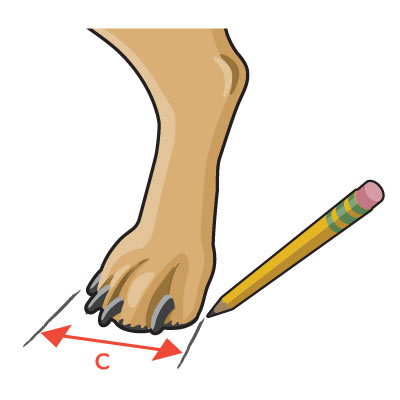
For the most accurate width measurement, we recommend placing a piece of paper behind your patient’s leg and making a mark on either side of the leg at the hock or carpal joint. Once complete, measure the distance between those two marks to determine the width of the pet’s leg
How to Fit Splint to Your Pet
The Walkin’ Fit Adjustable Splint provides you the ability to change the joint angle and width of the splint. It’s important to remember the first adjustment made MUST be the angle.
Step One: Undo all Velcro straps so you can easily test fit the splint as you go along. It’s best to Velcro the straps to themselves off to one side.
Step Two: Slightly loosen both black knobs on either side of the splint to adjust the angle. The splint adjusts in 10-degree increments. Most pets’ natural REAR hock angle will likely be on the middle notch, marked 30 degrees, which is about 135 degrees. Most pets’ natural FRONT carpal joint angle will likely be on the second notch marked 10-degree angle, about 170 to 180 degrees. Again, every pet’s confirmation will vary. Set the splint joint angle to best fit your pet’s natural stance referencing the non-splint leg if needed. Retighten the black knobs to secure once the angle has been adjusted.
Step Three: Before continuing, test fit the splint to check angle and width.
Step Four: If you need to widen the splint, continue to Step Five. If the splint width does not need to be adjusted, proceed to Step Six.
Step Five: To widen the splint, you want to make incremental, even adjustments on each screw. Use the Allen Key provided, start from the top screw, and work your way down the splint to widen evenly. Loosen each screw slightly; the splint will widen the more you loosen the screws.
Step Six: Test fit the splint on your patient until the width is correct. Once the required width is set, hold the splint at a new width while slightly tightening screws to secure.
Step Seven: Now that your splint is all set and adjusted for your patient, you can secure straps.
Step Eight: Place leg in a splint. Starting at the bottom with the paw, Velcro all straps to secure splint on the leg. Check for any areas of rubbing or incorrect fit. The leg should fit snugly in the splint without rubbing, or areas of skin hanging over or pinched in the splint. If you’re now ready to go, reference the usage tab for instructions on encouraging your patient to walk in the brace. If you’re having trouble fitting the splint, please contact our Veterinary Resources Team.
Patient Resource Guide: How to Introduce a Splint to Your Pet
How long should the Walkin’ Fit Adjustable Splint be worn?
Splints are not designed to be left on pets for extended periods. Patients should be introduced to the splint slowly until they are comfortable. Guide clients through the process with the Patient Resource Guide: How to Introduce a Splint to Your Pet
How do I use the Walkin’ Adjustable Splint?
Injuries to the lower limb of small animals often need to be splinted or braced. These splints can be used on the lower front or rear leg for stability and support and are available in a full range of sizes to accommodate comfortably. Inform your clients that pets should always be supervised when using the splint.
Where do I put the splint?
The Walkin’ Fit Adjustable Splints are placed on the back of the rear or front leg and held in place by padded touch fastener closure straps. They extend about halfway up the leg. The bottom of the splint extends entirely under the paw to provide weight-bearing support. This is ideal for fractures, knuckling, and other ailments.
What are the splints made of?
Splints are made of hard plastic with a soft foam lining and a non-skid pad on the bottom. The non-skid pad will not work well on some slippery surfaces. Before using the splint, test it on the surface to ensure it will grip adequately.
How will I know if the splint fits well and how long to wear it?
Splints should be used only when recommended by a pet care professional who will determine whether the splint is appropriate, how long it should be worn, and what problems might occur that indicate that the splint’s use should be discontinued. Possible issues may include chafing, muscle atrophy, or extreme distress of the animal.
How should I introduce the splint to a pet?
The Walkin’ Fit Adjustable Splint is intended for professional use only. As a veterinary professional, we recommend that you do the initial fitting and guide your customer throughout their pet’s course of treatment. For at-home education, please refer to the Patient Resource Guide: How to Introduce a Splint to Your Pet for step-by-step instructions on how to begin using the splint.
How do I put the adjustable splint on my patient?
Initial splint fitting and adjustment should be completed with the guidance of a Veterinary Professional. Putting a thin sock on the leg before applying the splint is sometimes more comfortable for the dog. Splints should ideally be used on a standing animal. You may apply to an animal laying down. Just check the fit and retighten straps if needed when they stand up. Make sure to make ALL width and angle adjustments with the brace off of the animal. Once the splint is correctly adjusted to fit, you may begin to place it on the animal. Starting at the bottom, place the foot flat in the bottom of the splint. Make sure that the toes do not extend over the bottom edge. Snug the bottom strap first and work your way up the splint. Check for a snug fit after the animal has taken a few steps. When tightened correctly, you should be able to fit a finger under each strap comfortably.
How do I know what angle to set the splint at?
The natural angle of the hock or Tarsal joint on the rear leg is about 30 degrees. The natural angle of the carpal joint or wrist on the front leg is about 10 degrees (this is much straighter than the rear leg). Remember every patient’s confirmation with vary. The splint angle should be set at a natural, comfortable position in most cases. You may reference the healthy leg as a guide to set the splint if needed.
How do I know what width to set the splint at?
The splint should be set to be slightly wider than a pet’s leg or paw. Allowing a small amount of room on either side will provide a secure fit without rubbing. You want to avoid having your pet’s leg rubbing the sides of the splint when walking and standing or too much room on either side, allowing the paw to move around in the splint.
My patient has a knee problem (ACL or Patella). Will a splint work for this dog?
No, splints will support the lower limb for the animal but will not go high enough to support the knee on the dog. A Walkin’ Wheels wheelchair can help lessen the pressure on a pet’s knee and make it easier for them to maintain normal activity levels without further injury.
My patient falls between sizes in your chart; should I order the larger size?
If your pet’s measurement falls between sizes, please call us at 1-866-578-2926, and our Veterinary Resources Team will help you to determine the correct size.
Can I change or remold the splint with heat?
No. The splint is adjustable in width and angle, so you will not need to reshape it. We do NOT recommend heating or modifying the splint in any way that could change the splint’s structural integrity.
Does the splint have any tread or soiling on the bottom so the dog will not slip?
Yes, the splints have a non-skid surface on the bottom. This non-slip pad should allow the patient to maintain traction and avoid slipping on slippery surfaces.
Do the splints have any padding inside, and can they be cleaned?
Yes, the splints are fully lined with foam and may be spot cleaned and left to air dry.
Have a question about this product?